Survival: Fountain of Youth Bird Region Walkthrough
Our Survival: Fountain of Youth Bird Region Walkthrough will tell you everything you need to do to complete the story in the first Region of the game!
< Starter Guide | Bird Region Walkthrough | Buffalo Region Walkthrough >
Your first few days of Survival: Fountain of Youth are going to be spent looking for Food and Water. In a few short in-game days, you’ll grow to the point where you can explore the entire Map and make a Boat to travel to other Regions. Read on to learn how to complete the story of the Bird Region, step by step!
Survival: Fountain of Youth Bird Region Walkthrough
We’re right at the beginning of our adventure! If you haven’t yet learned the basics of the game, you should check out our Starter Guide — this Walkthrough continues under the assumption that you’ve completed it and learned the basics of Crafting, Food, Water, and Mapping.
You should already have grabbed the Living Water and notes in the Grotto Cave and set up some basic equipment: a Box Made of Sticks and a Primitive Leaf Bed. Now, we’re going to get to work on our next objective.
Improving the Grotto
Your next major goal after exploring the Grotto is to get your hands on Ponce De Leon’s lost Spyglass. Before we get moving, though, we’re going to make some basic equipment to increase our chances of survival.
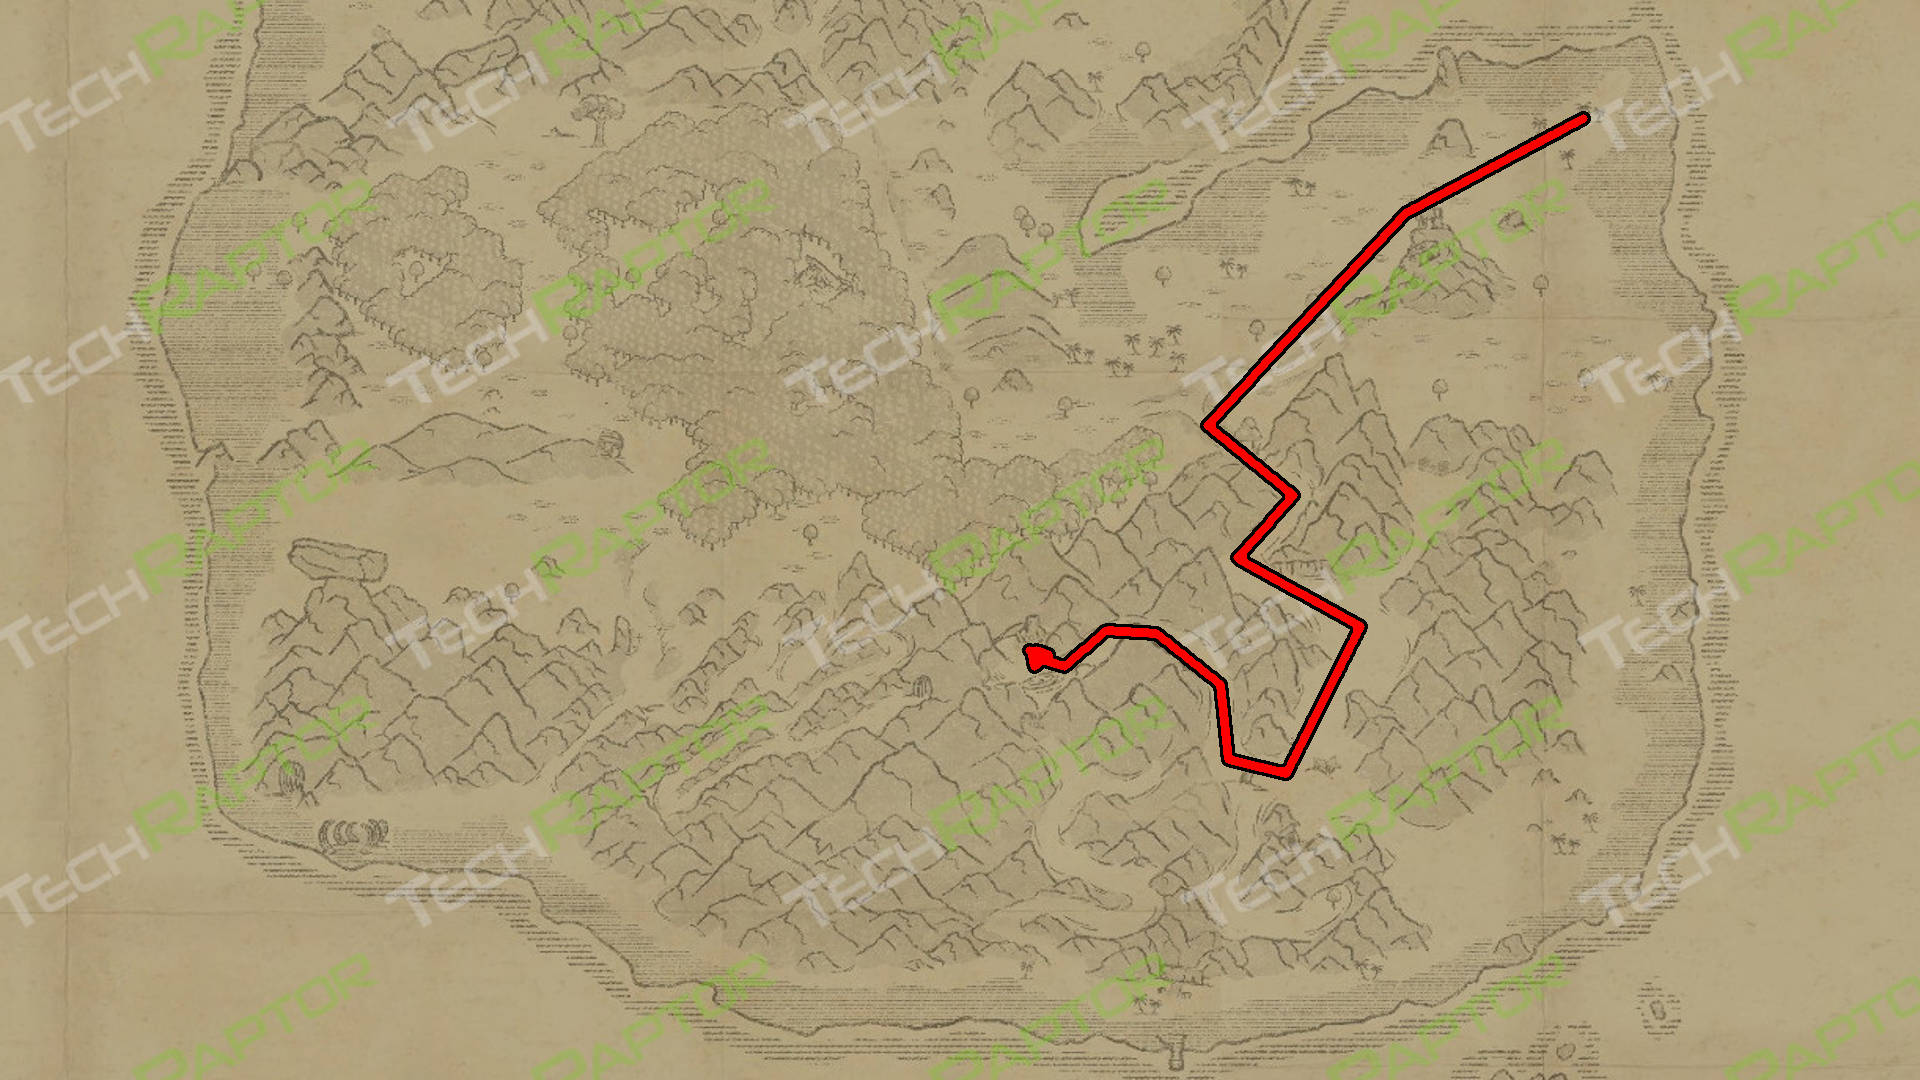
Using the Map as a guide, we’re going to head this way and collect some resources. Make sure to leave in the morning and take your Iron Axe with you so you can protect yourself. If it’s late in the day, sleep in the Primitive Bed of Leaves in the Grotto Cave until just before morning. When you wake up, you’ll take this route:
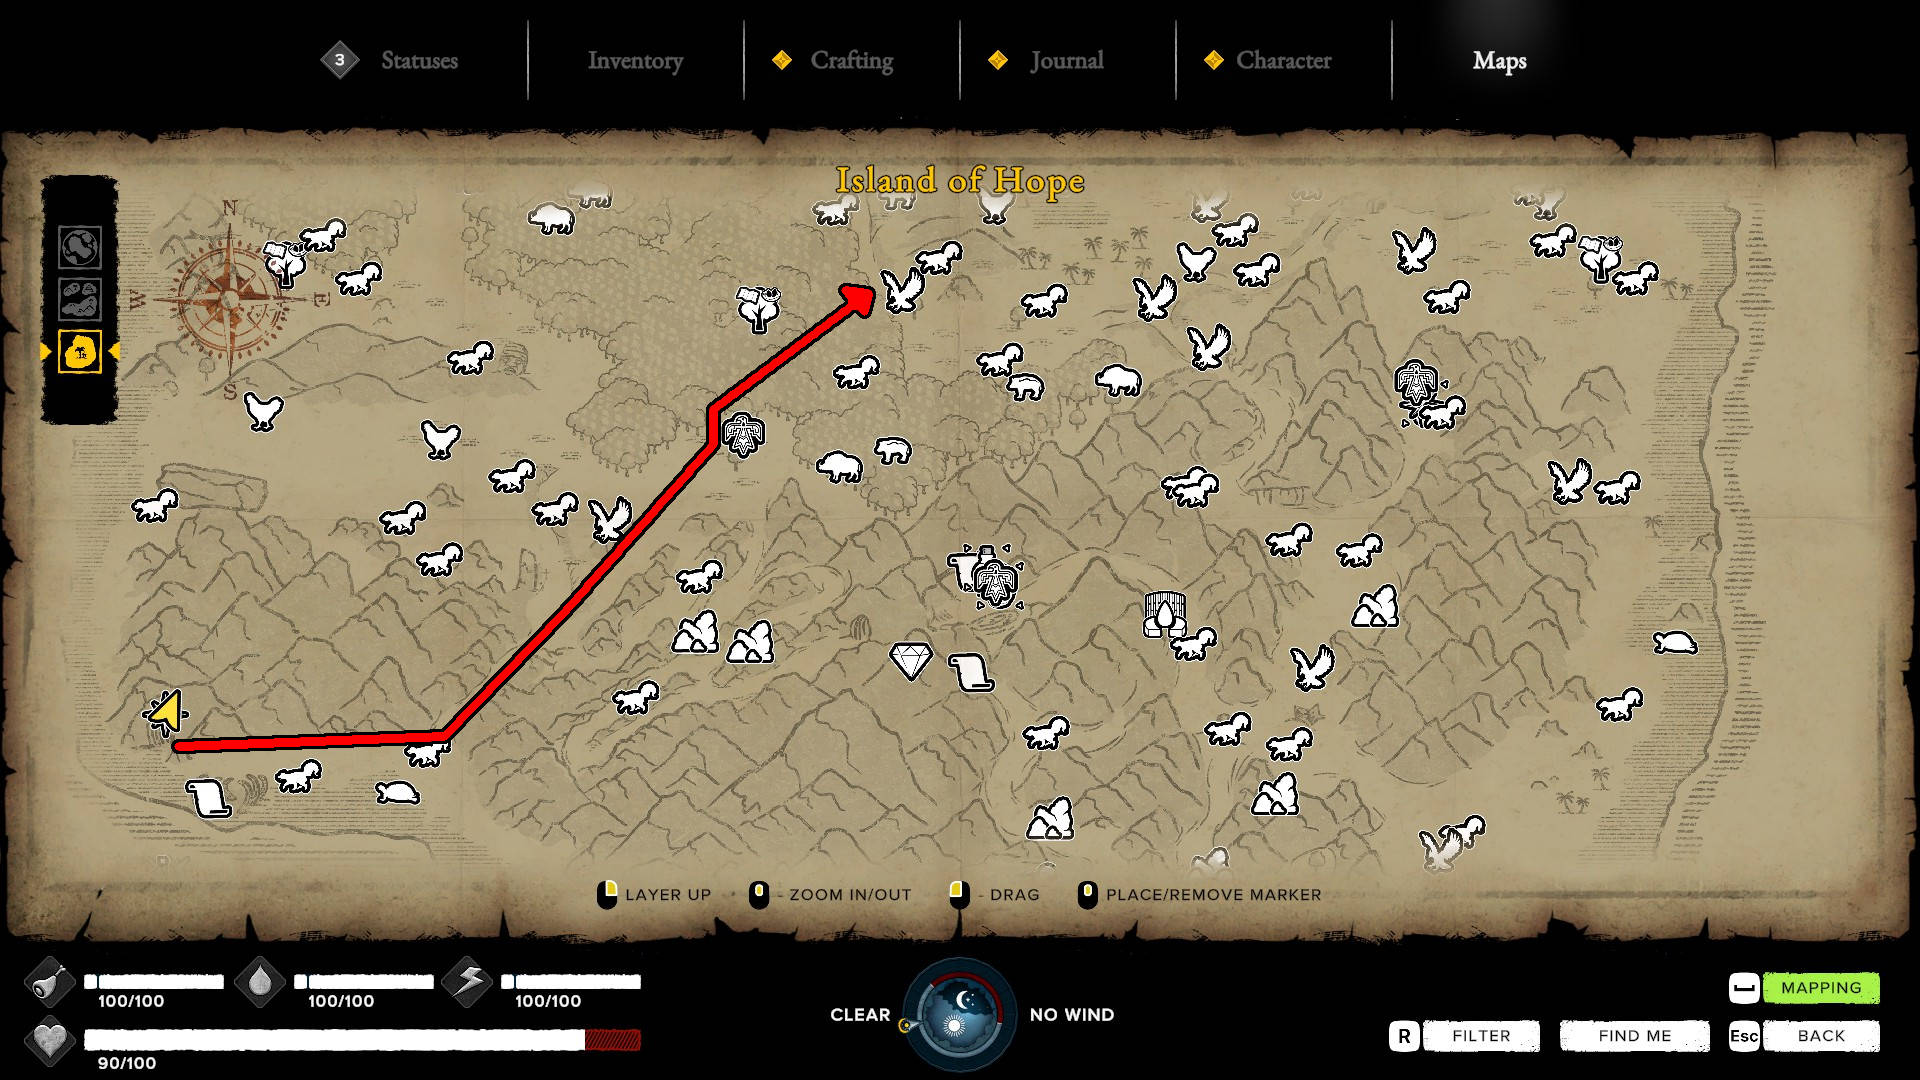
You’ve already been this way before — it takes you to the first Cartographer Tree. This time, we’re aiming to get the following items at the minimum:
- 12 Small Sticks
- 6 Liana
- 6 Long Stick
- 15 Wide Leaf
- 15 Narrow Leaf
- Any Food you can carry
You may have to explore the area a little bit to get what you need. Don’t stray too far away from the area, and take care to return back home if it starts getting dark. Note that there is also a Chronicle that you can grab nearby.
Collect these items (and anything else of interest) and return to the Grotto Cave with them. (You should be able to get all of this in one trip, but you can make multiple trips if needed.)
Craft some Liana Rope. This will open up a bunch of new Crafting Recipes, but we’re only concerned with a few. Craft the following items with your new resources:
- 1 Primitive Torch
- 1 Wooden Spear
- 1 Leaf Hat
- 1 Leaf Cape
- 1 Leaf Skirt
- 1 Leaf Sandals
- 1 Hut Made of Leaves
- 1 Portable Box
- 1 Portable Leaf Bed
- 1 Protected Box
- 1 Large Box Made of Branches
Equip the Leaf clothing, Wooden Spear, and Primitive Torch. Dismantle the Primitive Bed of Leaves in the Grotto Cave and replace it with the Hut Made of Leaves. Place the Protected Box and the Large Box Made of Branches in the Grotto Cave. Use the Protect Box to store any perishable Food and use the Large Box Made of Branches to store any leftover Crafting materials.
These items will make it easier to collect resources. We’re going to make at least two more trips to grab the things we need. Here’s our next destination:
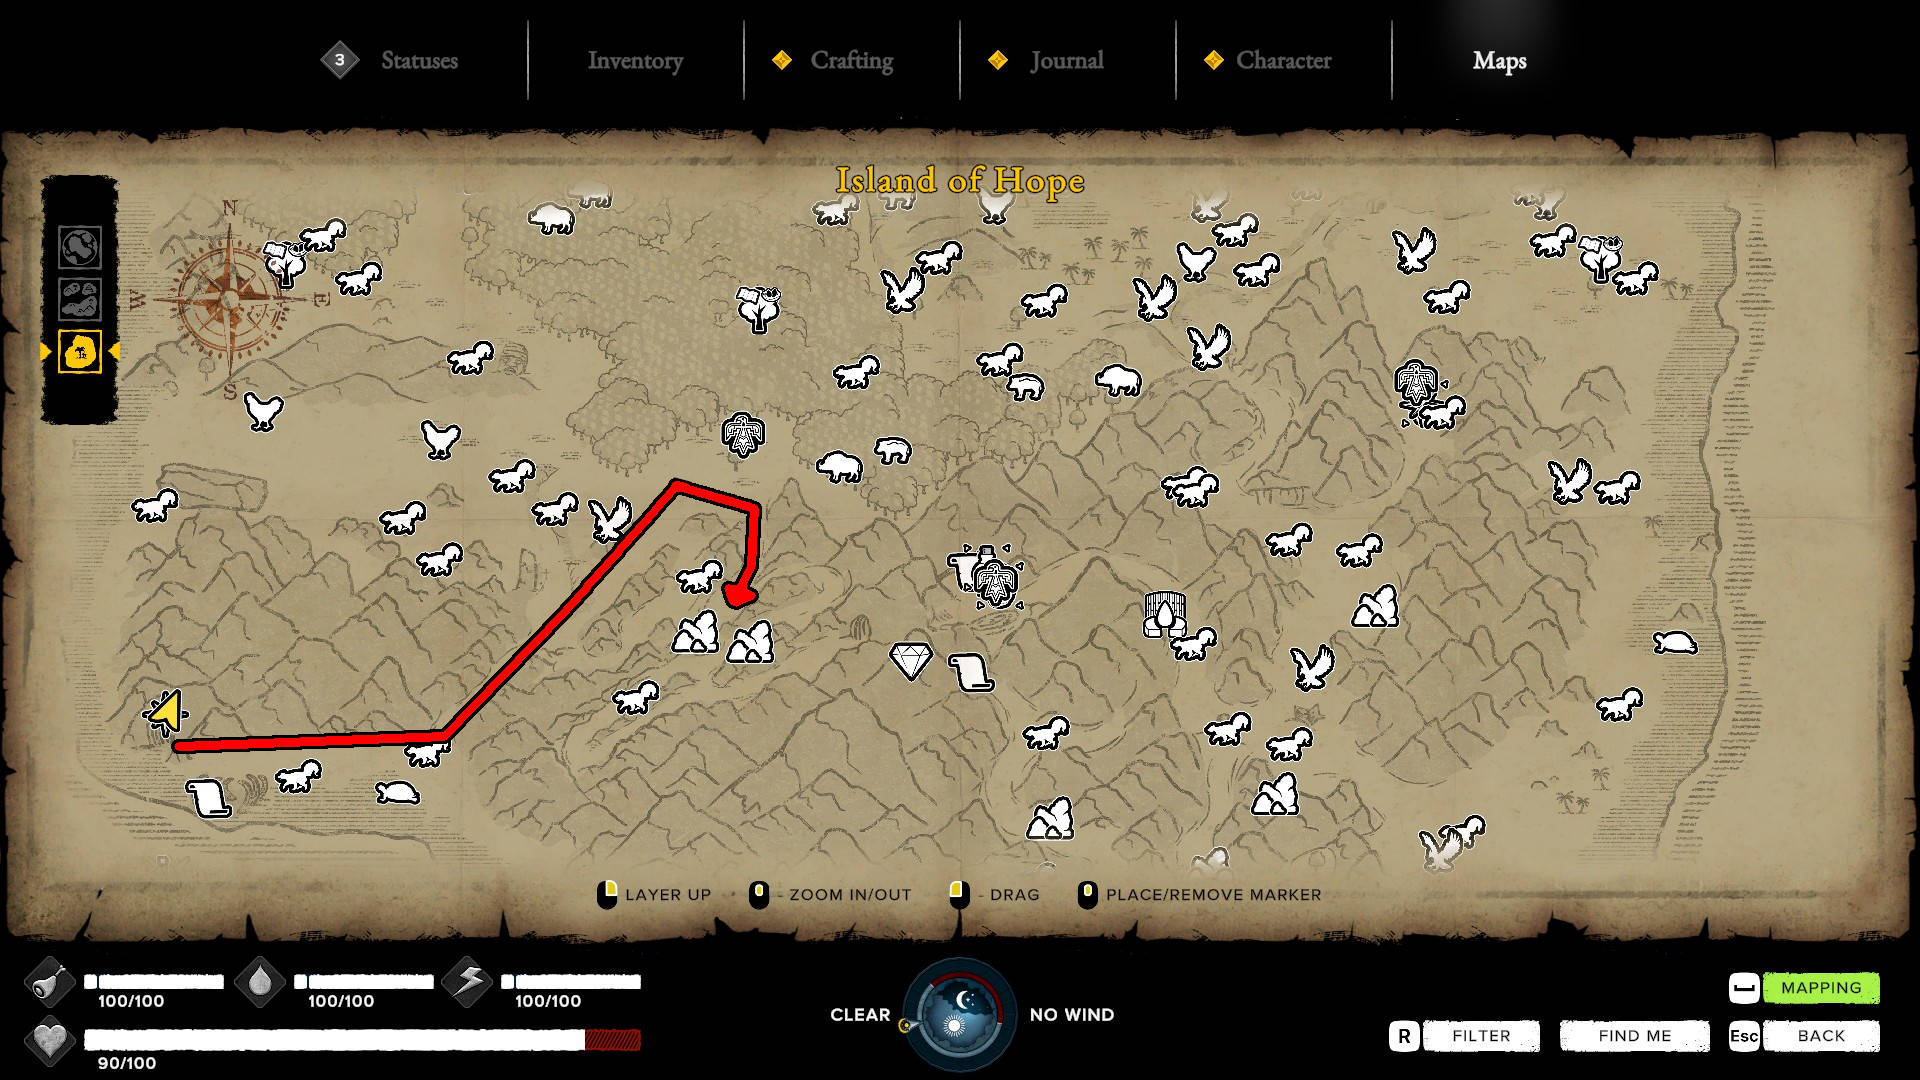
This short journey will take you to a Stone Deposit and a Stone Pile. You can’t harvest from the Stone Deposit without a Pickaxe, but there will be at least 1 Massive Stone on the ground nearby.
Collect at least 1 Massive Stone and pick up as many Stones as you can carry, then return to the Grotto. Make sure to also grab at least 2 Ripe Coconuts (and 2 Liana Rope and 2 Narrow Leaves if you’re running low on those). Craft the following items:
- 1 Stone Saw
- 1 Stone Cutter
- 1 Improved Stone Axe
- 2 Coconut Flasks
- 4 Mapping Charcoal
Store these items (and any excess resources) in your boxes.
We have one more trip to make on a similar route, but this is going to be a longer journey. Make sure to wait until early morning before leaving — sleep in your Hut if you need to.
Here’s where we’re headed next:
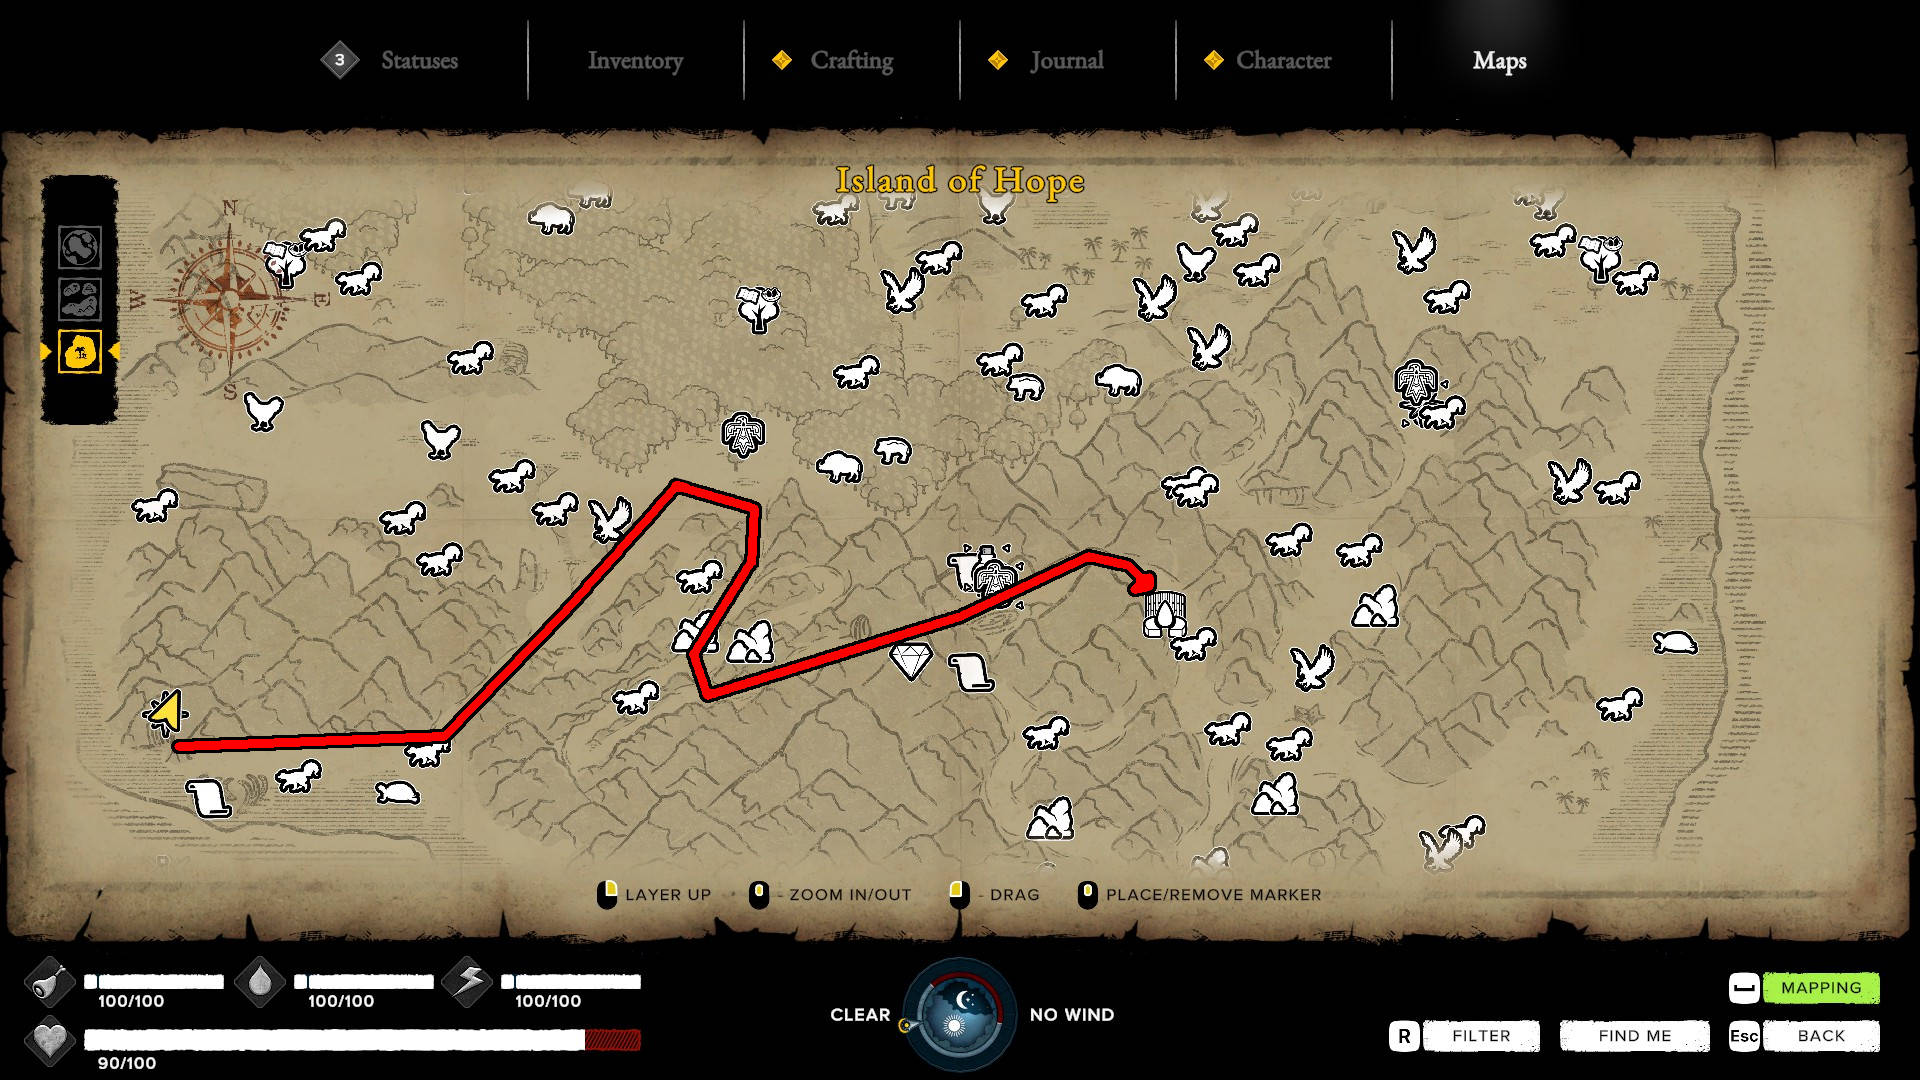
Make sure to do Mapping along the way. It will work especially well when you’re on the mountain because the increased altitude will give you a distance bonus.
This is going to lead us to the closest Water Storage. You can interact with it and use the Coconut Flasks to get a decent supply of Clean Water. If there is any Water left over, drink it — the Water Storage will refill on its own over time.
An equally important resource in this area is Clay. It’s pretty heavy, so you might not be able to take all of it back with you. Grab at least 4 Bamboo Sticks in the area, too. Carry as many Bamboo Sticks and Clay as you can (along with the Water) and return to the Grotto.
Next, we’re going to need a few Common Logs. Head outside and gather any resources in trees that do not have Coconuts. Cut down a couple of trees and drag Common Logs inside. You’re going to build a Carpentry Workbench, which requires the following:
- 1 Common Log
- 5 Small Stick
- 1 Liana Rope
The Carpentry Workbench allows you to transform Common Logs into other types of Wood. Use the Carpentry Workbench to make a Split Log — this will unlock a few more Crafting Blueprints.
With that done, it’s time to make a Log Cart. You’ll need the following items to make it:
- 1 Split Log
- 3 Small Stick
- 1 Liana Rope
When this is done, head a good distance away from the Grotto Cave and fill the Log Cart up with 6 Common Logs. You’re going to use all of them eventually
Next, we’re going to upgrade the Grotto Cave with some more Workbenches. You may have to get some more Common Logs and other resources, but you know where to get stuff by now.
Here’s what you’re going to make next:
- 1 Food Dehydrator, then dismantle it
- 1 2-Compartment Food Dehydrator, then dismantle it
- 1 3-Compartment Food Dehydrator
- 1 Kiln
- 1 Regular Workbench
- 1 Tanner Workbench
- 1 Chemistry Workbench
- 1 Pottery Workbench
- 4 Skin Dryer
- 1 Large Protected Box (replacing your Protected Box, if needed)
All of these Workbenches will allow you to make most of the important items you’ll need.
There’s one more item we’ll need to make: a Water Distiller. This will give you easier access to Clean Water since you can distill Salt Water with it. Making it is going to be a bit involved process — here’s what you’re going to have to do:
- Craft 1 Clay Strip (x4) at the Pottery Workbench.
- Craft 1 Clay Brick (x2) at the Pottery Workbench.
- Craft 2 Raw Clay Pot at the Pottery Workbench.
- Craft 2 Fired Pot at the Kiln.
- Craft a Water Distiller.
With the Water Distiller, you’ll now have ready access to Water. Food will be easy enough to get by foraging or killing Animals. Speaking of which, we’re going to go do a little bit of that now, too.
Hunting Animals
Now that the Grotto Cave is a little more comfortable, we’ll need to start planning for the future. We’ll need to hunt some Boars, Peccaries, and Jackals. (Refer to our Island of Hope Map if you’re having trouble finding them!) We’re specifically looking to get the following Crafting resources:
- Animal Fat
- Animal Tendons
- Bone
- Fresh Hide
If you wish, these items can be used to Craft some more advanced armor and equipment. Make whatever you like and get ready to move again — it’s time to finally get moving with our objectives.
Forgotten Spyglass
Getting to the Forgotten Spyglass is fairly easy, especially since you’re now well-equipped. Here’s the route that you need to take — once again, plan to leave in the early morning so you have plenty of daylight. Make sure to take your Portable Leaf Bed with you on this trip.
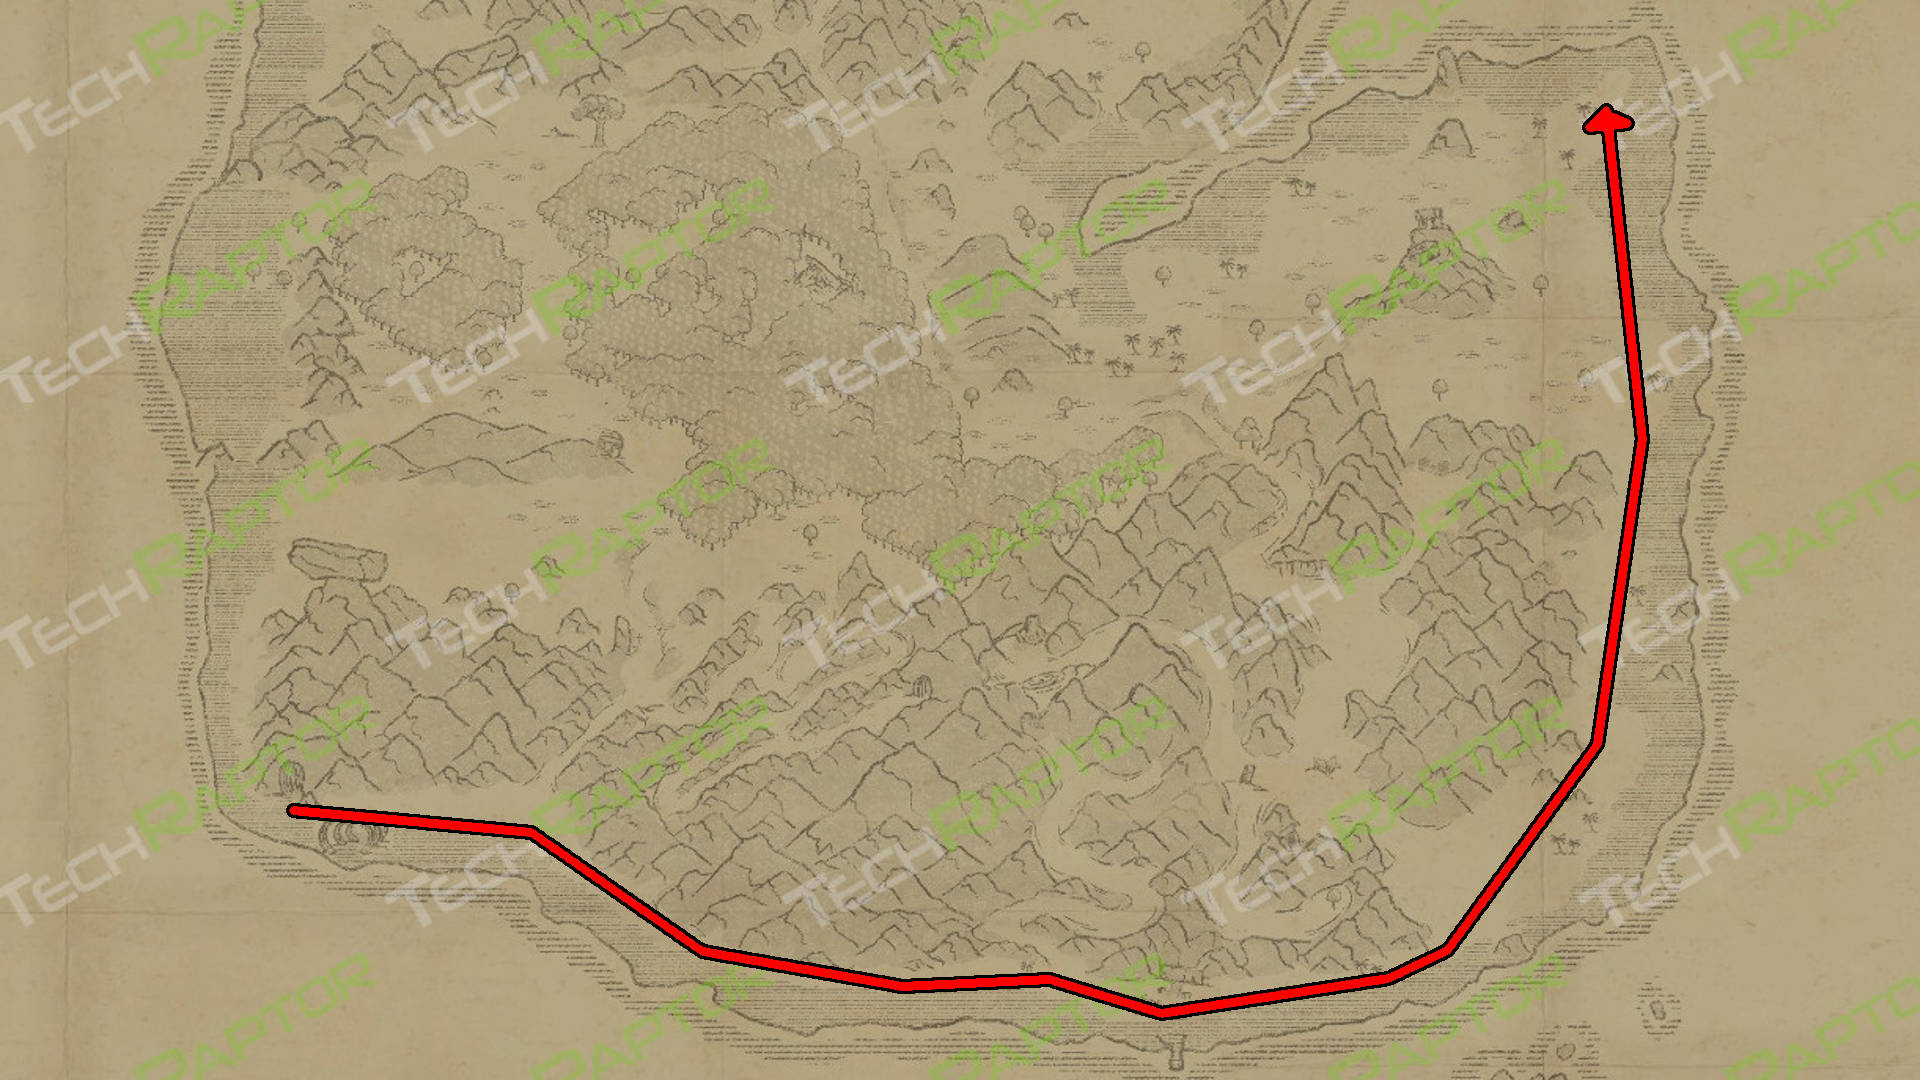
There will be a Chronicle along the way on the southern side of the island — make sure to pick it up. Grab a Green Coconut or two if you see them so you can replenish your Water stat.
The Forgotten Spyglass isn’t too hard to find. Here’s what it looks like if you’re having trouble locating it:
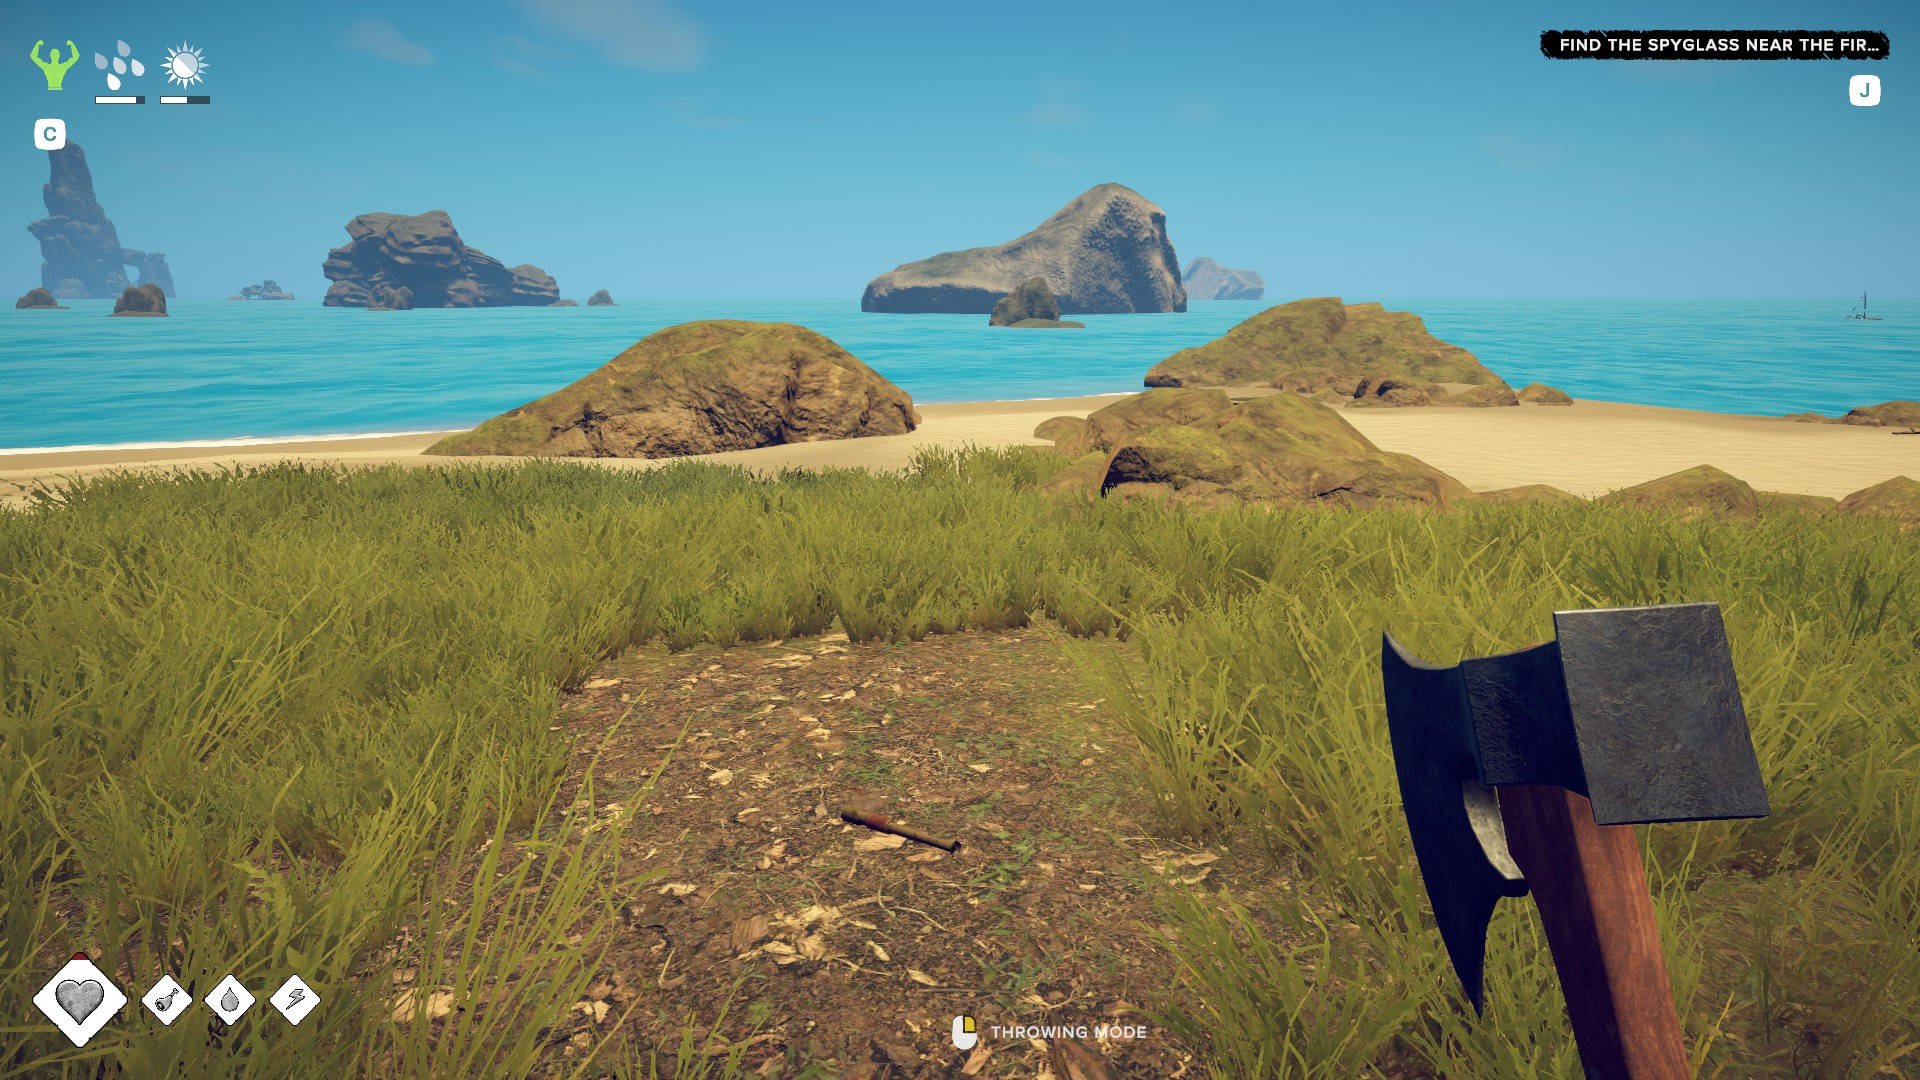
Collecting the Forgotten Spyglass will activate your next Goal: heading back into the mountains.
View from the Mountain
Our next task will be to take a trek up into the Mountain. Instead of going back home, we’re going to head directly there from where we found the Forgotten Spyglass.
You’ll notice that there’s a large temple very near the place where you found the Forgotten Spyglass — this is another Chronicle, but you’ll have to solve a quick puzzle to get it.
Once you get up to the Observatory in the mountains, you’ll be able to walk to the edge and trigger an in-game cutscene. If it’s too late, use your Portable Leaf Bed to sleep until the daytime. When it’s the right time, this is what you’ll see:

The Observatory is home to another Chronicle, a bottle of Living Water (on top of the Observatory), and a side quest. Grab whatever you like, then return home so you can prepare for the next stage of your journey.
Getting Ready for Sailing
Our next goal is to go to Lonely Rock, but you’re not going to be able to swim there. You’re going to need a Boat and a Dock to go with it.
Let’s talk Boats for a moment. With the resources available to you on the island now, you can make either a Raft or a Canoe. I strongly recommend that you go for a Canoe — it’s faster and more durable. Make yourself a Canoe, then upgrade it to an Improved Canoe. Then, upgrade the Improved Canoe to a Solid Canoe.
You’re going to want to get some Food, too. Fine Date Palms and use your Food Dehydrator to make Dried Dates. You’ll also want to have at least two full Coconut Flasks of Clean Water for your eventual journey to the next Region.
These Food items can sit in your Protected Box for now. We’ll be leaving soon, but first, we have to visit the Lonely Rock.
Lonely Rock
Taking your Boat to Lonely Rock won’t be all that difficult. Here’s the minimum of what you should have before you leave:
- A full Health meter
- A full Food meter
- A full Water meter
- A full Energy meter
- 1 item of Food
- 1 Coconut Water or 1 Coconut Flask
- 1 Melee Weapon
- A full set of Leaf Armor or better
- 1 Steamed Bandage
- 3 Builder Toolkit
- 1 Primitive Torch or 1 Improved Torch
- 8 Mapping Charcoal
Once you have all of these things, start sailing toward Lonely Rock.
When you get near the Northern part of the island, place another Dock down. This will allow you to use it as a Fast Travel Point and make it easier to get around the island quickly.
Approach Lonely Rock and you’ll see a small cave on the southern side of the rock. Hop out of your Boat, swim ashore, and you’ll find a cave. Continue walking forward and you’ll see a skeleton next to a note and a Book.
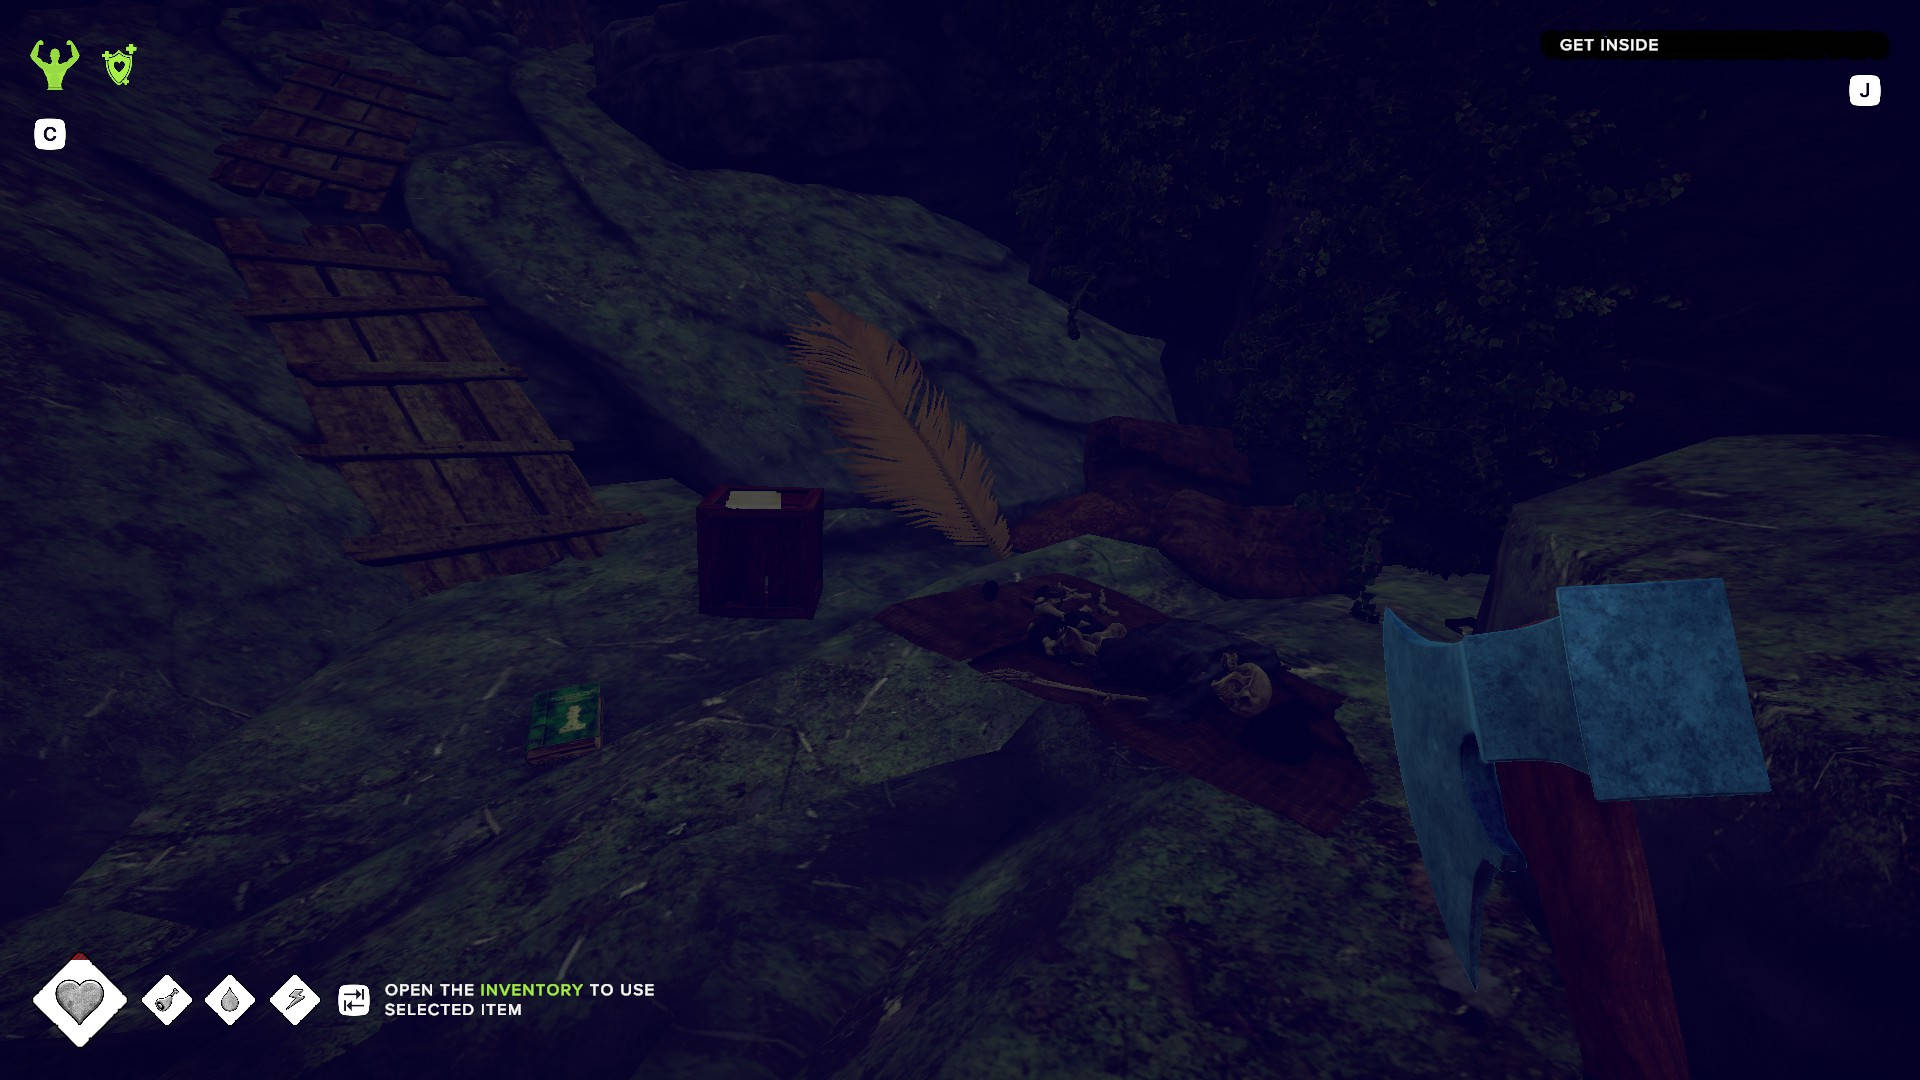
Grab the note and the Book, then follow the path up. Wait before going outside — there are three Harpies flying around outside that will surely attack you. Carefully kill them one after another, then approach the skeleton on the top of the mountain.
Another cutscene will play and you’ll learn a little more about the story. You’ll then have your final Story Goal for the Bird Region.
Sailing to the Buffalo Region
Visiting Lonely Rock is officially the end of the story for the Bird Region — with a Boat, dried Food, and stored Clean Water, you are now equipped to travel to the next Region: the Buffalo Region.
Although you can leave right now, there is still plenty to explore in the Bird Region. Investing some time in completing the Map is a good idea, especially because it will reveal some useful items in the area. (Don’t worry about forgetting anything or missing out — you can always come back to the Bird Region!)
There are also a bunch of collectibles that you’ll want to pick up as they all have positive effects on gameplay. You can learn more about these kinds of items in the following guides:
Take some time exploring the Island of Hope and building up your resources. Once you have a nice stockpile built up, it’s time to get moving to the Buffalo Region!
< Starter Guide | Bird Region Walkthrough | Buffalo Region Walkthrough >
Thanks for reading our Survival: Fountain of Youth Island of Hope Walkthrough. If you found it helpful, why not check out our other guides below?
Source: MakeUseOf